

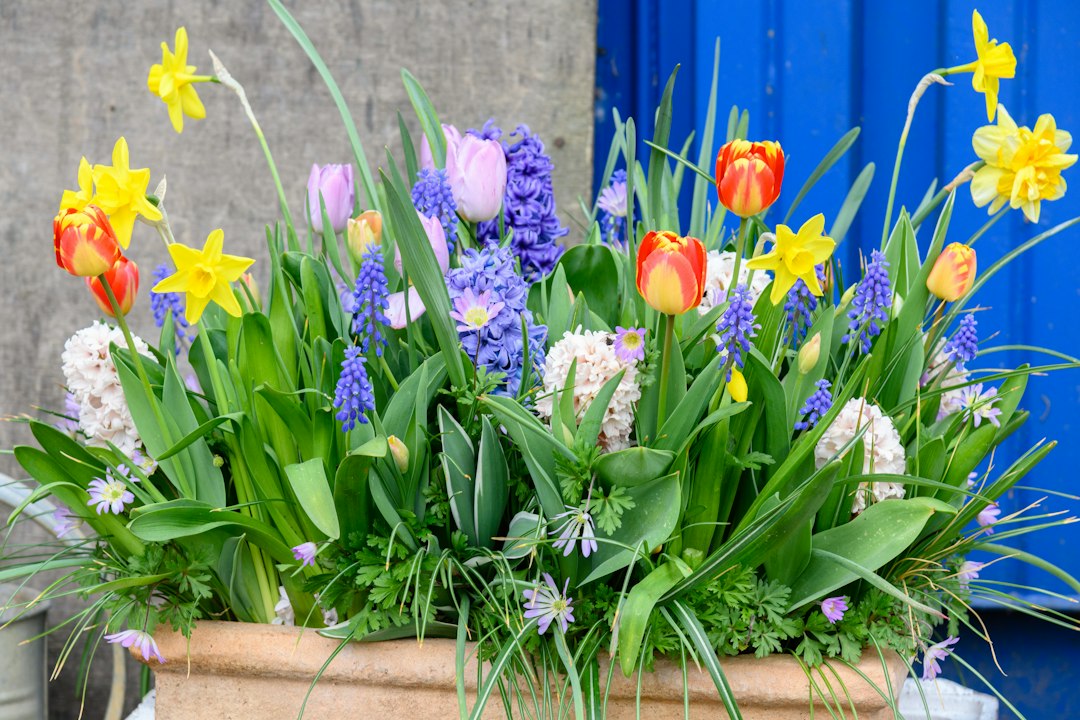
By Holland Kertészet, Your guide to beautiful spring container displays
There is something almost magical about opening a front door in late February or March to find a pot overflowing with snowdrops, then crocuses, then hyacinths, and finally a grand finale of tulips, all from a single container you planted back in October. This approach, known as bulb lasagne planting, is a fabulous way to enjoy a continuous succession of flowers throughout spring by carefully layering early, mid, and late-flowering bulbs in pots, and it is particularly brilliant for brightening up a corner of your garden, patio, or balcony. In my experience, it is one of the most rewarding things you can do in the autumn garden, and the results genuinely surprise people every single time.
The key idea is that the latest-flowering bulbs are placed nearest the bottom of the pot, while earlier types sit above them. It is a great technique if you have limited space, as one pot can provide a succession of colourful flowers. This guide walks you through every layer, with specific depth measurements, real planting examples, and practical advice for Hungarian winters.
Key Takeaways
-
One pot, months of colour: A well-planted layered pot can flower from February (crocuses and snowdrops) through April (daffodils, hyacinths) to May (tulips), three months of colour from a single container. Therefore, invest in one deep, quality pot rather than several shallow ones.
-
Pot depth is everything: Plant in a pot at least 40 cm deep and 40 cm wide, filled with peat-free multipurpose compost and horticultural grit. A pot shallower than this will not accommodate three full layers and your display will suffer.
-
Largest bulbs go deepest: The biggest bulbs, which are the later bloomers, go into your pot first; you then move through to the smallest ones on top, which are the earliest to flower. Getting this order right is the single most important rule.
-
Drainage prevents disaster: Mix peat-free compost with horticultural grit at roughly 70:30, which creates air pockets and stops the compost staying soggy over winter. Bulbs sitting in cold, wet compost will rot before they ever flower.
-
Cold is your friend: Insufficient cold is the most common reason bulb lasagnes fail to flower. Bulbs need 12 to 16 weeks below 9°C to trigger vernalisation. Hungarian winters provide this naturally, so do not bring pots indoors to a warm room.
Quick-Start Prioritisation Framework
Use this table to decide which approach suits your situation before you buy a single bulb.
| Setup | Best For | Pot Size | Layers | Time to First Flower |
|---|---|---|---|---|
| Classic three-layer lasagne | Patios, balconies, front steps | 40 cm deep x 40 cm wide | Tulips / Hyacinths / Crocus | Late February |
| Two-layer starter pot | Beginners or smaller spaces | 30 cm deep x 30 cm wide | Daffodils / Crocus | February |
| Grand five-layer display | Large terraces, statement pots | 50 cm+ deep | Tulips / Alliums / Daffodils / Muscari / Snowdrops | Late January |
| Window box two-layer | Narrow balconies | 20 cm deep | Dwarf narcissus / Crocus | March |
Start here if you are:
-
A first-timer: Go for the two-layer starter pot with daffodils and crocus; it is forgiving, inexpensive, and very hard to get wrong.
-
Short on space: A 30 cm window box with dwarf narcissus over crocus gives a long display without taking up floor space.
-
Going for impact: Choose the classic three-layer lasagne in a 40 cm terracotta pot. This is the display that stops neighbours in their tracks.
Choosing the Right Pot
Size and Material
Bulb lasagne planting layers three to five types of bulb at staggered depths in a single container, producing flowers from winter into early summer. A standard 40 cm pot holds several layers, with larger late-flowering bulbs below smaller early bulbs. Use a frost-hardy container with open drainage holes and a free-draining peat-free compost.
You can get three layers of bulbs into a pot as shallow as 30 cm deep, but the deeper your pot, the more flexibility you have with bulb combinations. I have found that 40 cm is the sweet spot for most home gardeners: deep enough for tulips at the bottom, yet not so enormous that it becomes impossible to move to a sheltered spot for winter.
In terms of material, terracotta is the classic choice for good reason; it breathes well and looks beautiful. However, glazed ceramic frost-proof varieties are also excellent choices; just ensure any terracotta pot is labelled frost-proof grade, as standard terracotta can crack in a hard frost. For Hungarian winters, where temperatures can drop sharply, a frost-proof glazed ceramic or fibrecite pot is a practical investment.
Drainage Setup
Drainage is critical with bulbs so all pots need one or more holes in the bottom. These holes then need to be covered with crocks, pottery shards or pebbles, to keep them from being clogged with earth.
Pro tip: Stand your pot on pot feet or two bricks before filling it. This lifts the drainage holes off the ground so water flows freely rather than pooling underneath. Moving a pot full of wet compost and grit after the fact is no fun at all.
The Best Compost Mix for Layered Bulbs
Getting the compost right is non-negotiable. Bulbs hate sitting in cold, wet soil for months on end, and the right mix is what keeps them healthy until spring arrives.
For bulbs spending one season in a container, use a mix of three parts peat-free multi-purpose compost with one part grit. Plant at three times their depth and one bulb-width apart. For a longer-term display that you plan to keep for two or more years, the Royal Horticultural Society's planting guidance recommends three parts peat-free mixed with one part grit for better long-term structure.
The grit improves drainage preventing bulbs from rotting in waterlogged conditions. Avoid heavy, clay-based soils, which retain too much water and can suffocate the bulbs. In practice, this means never using garden soil straight from your beds in a pot.
Pro tip: Mix your compost and grit together in a large bucket or on a tarpaulin before filling the pot. This ensures an even distribution throughout every layer, rather than grit sinking to the bottom on its own.
Step-by-Step: How to Layer Your Bulbs
This is the core of the method. Work through the layers methodically and the rest takes care of itself.

Step 1, Prepare the Pot
Cover the drainage holes with crocks or broken pieces of terracotta. Add a 5 to 8 cm layer of your compost-and-grit mix to the bottom of the pot. This creates the root-growing space below your first bulb layer.
Step 2, Plant the Bottom Layer (Late-Flowering Bulbs)
Your largest, latest-blooming bulbs go in first and deepest. Plant the deepest layer, tulips - at 20 cm from the surface of the finished pot. Place tulip bulbs with the pointed tip facing upward. Plant them about 15 to 18 cm deep and 10 to 13 cm apart, ensuring the pointed ends face upwards.
Space them sufficiently depending on their size and the guidance on the packet, approximately 2 to 3 cm between bulbs should be sufficient for most varieties, as you want your pot to be full of colour. Cover this layer with 5 cm of compost mix.
Good choices for the bottom layer:
-
Late-flowering tulips (e.g., Darwin Hybrids, Parrot tulips)
-
Large-cupped daffodils (Narcissus)
-
Alliums (for a slightly later finale)
Step 3, Add the Middle Layer (Mid-Season Bulbs)
Add compost until the bottom layer bulbs are just buried, then add your middle-sized bulbs, smaller daffodils, hyacinths, or alliums. Plant these about 10 to 12 cm from the surface, positioning them in the spaces between your lower bulbs when viewed from above.
Good choices for the middle layer:
-
Hyacinths (beautifully fragrant in March and April)
-
Smaller daffodil varieties such as Narcissus 'Tête-à-Tête'
-
Muscari (grape hyacinth)
Cover this layer with another 4 to 5 cm of compost.
Step 4, Plant the Top Layer (Early-Flowering Bulbs)
Cover the middle layer with more compost, then plant your smallest bulbs, crocuses, scillas, chionodoxas, or muscari, positioning them about 5 to 7 cm deep. Again, offset them from the bulbs below.
Good choices for the top layer:
-
Crocus (the very first splash of colour in February)
-
Snowdrops (Galanthus)
-
Chionodoxa (Glory of the Snow)
-
Scilla
Step 5, Finish and Water In
Cover the top layer with compost to within about 2 cm of the rim. Water thoroughly after planting to settle compost and eliminate air pockets. During autumn and winter, water sparingly and use your finger to check when the top 2 to 3 cm feels completely dry.
Layer Examples: Three Planting Combinations to Try
This is where many guides stop short. Here are three specific, tried-and-tested combinations you can use straight away. Browse the full bulb range at Holland Kertészet to source all the varieties listed below.

Example 1: The Classic Spring Sequence
This is the combination to start with. It delivers reliable colour from February to May with very little effort.
| Layer | Bulbs | Depth from Pot Rim | Flowering Period |
|---|---|---|---|
| Bottom | Late Darwin Hybrid Tulips | 18 to 20 cm | April to May |
| Middle | Hyacinth 'Delft Blue' | 10 to 12 cm | March to April |
| Top | Crocus 'Pickwick' | 5 to 7 cm | February to March |
Example 2: The Soft White and Cream Display
For a more elegant, restrained look, beautiful on a doorstep or against a dark wall.
| Layer | Bulbs | Depth from Pot Rim | Flowering Period |
|---|---|---|---|
| Bottom | Tulip 'White Triumphator' | 18 to 20 cm | April to May |
| Middle | Narcissus 'Thalia' (white daffodil) | 12 cm | March to April |
| Top | Snowdrops (Galanthus nivalis) | 5 to 7 cm | January to February |
Example 3: Bold and Bright for a Sunny Terrace
For maximum visual impact, this combination is a true show-stopper from late winter right through to May.
| Layer | Bulbs | Depth from Pot Rim | Flowering Period |
|---|---|---|---|
| Bottom | Tulip 'Queen of Night' (deep purple) | 18 to 20 cm | April to May |
| Middle | Muscari armeniacum (cobalt blue) | 8 to 10 cm | March to April |
| Top | Crocus 'Jeanne d'Arc' (white) | 5 to 7 cm | February to March |
One reassuring fact about these sequences: snowdrops always come before crocus, crocus before daffodils, daffodils before tulips. What shifts is the calendar, not the order. So even if your spring arrives slightly later or earlier than expected, the layers will still perform in the correct sequence.
Autumn Care and Winter Protection
When to Plant
Plant in October to November when soil temperature drops below 15°C for strongest root development. Plant spring bulbs from September to October, and tulips specifically in November, at three times the bulb's height deep. Tulips are planted last because they need the coolest soil temperatures to avoid fungal problems before winter sets in.
Overwintering Your Pot
In Hungary, winters can be genuinely cold, which is good news for vernalisation but means your pots need a little thought. Pots planted with spring-flowering bulbs can tolerate a certain amount of freezing weather, but will need some protection during moderate to severe periods of frost. Cover them with branches or circle the pots with bubble wrap to insulate.
The goal is to keep the pot sheltered from wind and frost, so positioning it along a warmer wall is ideal. If you place it under shelter, remember to keep watering it occasionally.
Pro tip: Raise your pot on bricks or pot feet during wet winters. The purpose of these stilts is to open up the drainage holes in order to allow rain to drain through and not form a puddle at the bottom of the pot. A pot sitting in a puddle of icy water is a recipe for rotted bulbs.
Keep in mind that bulbs need a period of cold, about six weeks or so, to break dormancy, so do not store them in a spot that gets too warm in the winter, such as a heated greenhouse or garage.
Common Mistakes to Avoid
Even experienced gardeners trip up on a few of these. I've made most of them myself at one point or another.
1. Planting bulbs upside-down. Tulips, daffodils, and hyacinths should be planted with the nose of the bulb upward and the root plate downward. If you genuinely cannot tell which end is which, lay the bulb on its side; it will find its own way.
2. Using ordinary garden soil. Common mistakes when planting tulip bulbs include using garden soil instead of potting mix, which is too heavy and retains too much moisture. Always use a purpose-mixed compost with grit.
3. Planting layers in the wrong order. The most common beginner error is putting small bulbs at the bottom and large ones on top. The basic principle is simply to plant the largest and longest-flowering bulbs at the bottom, with the smallest and shortest-flowering varieties at the top. Reverse this and your display will be a mess.
4. Letting the pot get waterlogged. The key to watering bulbs in pots is to keep the soil consistently moist but not waterlogged. Over-watering leads to bulb rot, while under-watering stresses the plants. Check the top 2 to 3 cm before watering, if it still feels damp, leave it another day or two.
5. Skipping the cold period. Spring-flowering bulbs require a cold period (vernalisation) to flower properly, and this must happen in the ground over winter. You cannot replicate this by planting in spring. The only way to have spring-flowering bulbs in spring is to plant them the preceding autumn.
Frequently Asked Questions
How deep does my pot need to be for layered spring bulbs?
For spring bulb lasagnes, a pot at least 25 to 30 cm in depth works for two layers; if you can go to 30 to 40 cm, that is better, because it gives you more options for layering. For a proper three-layer display, aim for at least 40 cm. Anything shallower and you will need to compromise on either the tulip depth or the number of layers.
Can I mix any bulbs together in one pot?
You can mix most common spring bulbs freely, but the key is to combine varieties with different flowering times rather than identical ones. When selecting your bulbs consider bloom times, colour, height, and texture. Planting three varieties of late tulip, for example, gives you a very short combined display rather than a succession of colour.
Do I need to water the pot over winter?
Yes, but sparingly. The grit improves drainage only water when the top centimetre of compost feels dry. In winter, pots need less water, but ensure they do not dry out completely. As spring approaches, increase watering as the bulbs start to grow. A pot sitting outside in a Hungarian winter will usually receive enough rainfall without much intervention.
Why did my bulb lasagne not flower last year?
The most common cause is insufficient cold. Bulbs need 12 to 16 weeks below 9°C to trigger vernalisation. If the pot was kept in a warm indoor space or an unusually mild spot, the bulbs may not have received the cold signal they needed. Moving the pot to a more exposed (but still sheltered from wind) position should solve this next season.
Can I add bedding plants on top of the pot for winter interest?
Yes, if you do not want your pots to look bare through winter, you can plant winter bedding in the top layer of compost. Violas are ideal for this, as it is easy for the bulbs to grow through them in spring. Pansies and polyanthus work equally well. Just be careful not to plant them too deeply into the compost, as you do not want to disturb the top layer of bulbs.
A Final Word
Layering spring bulbs in a pot is one of those rare gardening tasks where the effort invested in October pays dividends from February right through to May. One well-planted 40 cm container can produce 40 to 60 flowers across three to five flushes. That is an extraordinary return for an afternoon's work in the autumn.
The method is forgiving, adaptable, and genuinely fun to experiment with. Mix your colour combinations, try different bulb varieties, and keep notes on what bloomed when; you will refine your favourite recipe over a season or two. For a wide selection of quality spring bulbs suited to the European climate, visit Holland Kertészet, where you will find everything you need to build your perfect layered display.
Sources
-
How to Plant a Bulb Lasagne, Growing Family. Practical guide to layered bulb planting in containers. https://growingfamily.co.uk/garden-tips/plant-bulb-lasagne/
-
Bulb Lasagne Planting for a Succession of Colour, Peter Nyssen. Dutch bulb expertise on continuous spring flowering. This approach, known as bulb
-
How to Plant a Bulb Lasagne, Gardeningetc. Five-step guide to layered spring planting. https://www.gardeningetc.com/advice/how-to-plant-a-bulb-lasagne
-
Get Your Lasagne Ready, Country Gardener. Autumn bulb planting depths and layering order. https://www.countrygardener.co.uk/2026/09/25/get-your-lasagne-ready/
-
Bulb Lasagne Planting for Year-Round Colour, GardenUK. Container size, depth data, and layer-by-layer planting guide. https://gardenuk.co.uk/how-to/bulb-lasagne-planting-year-round-colour/
-
How to Plant a Bulb Lasagne, Garden Ninja. Depth measurements and honest assessment of the technique. https://www.gardenninja.co.uk/how-to-plant-a-bulb-lasagne-and-why-i-absolutely-loathe-them/
-
How to Plant Bulbs in Pots, Garden Ninja. Compost ratios, planting depths, and aftercare. https://www.gardenninja.co.uk/how-to-plant-bulbs-in-pots/
-
Bulbs: Planting Tips, Royal Horticultural Society. Authoritative European guidance on compost mixes and container planting. https://www.rhs.org.uk/plants/types/bulbs/planting
-
How to Plant a Bulb Lasagne, Sarah Raven. Layer ordering and pot positioning advice. https://www.sarahraven.com/articles/how-to-plant-a-bulb-lasagne
-
How to Grow Tulips, Dutch Grown UK. Tulip planting depth in cm and spacing guidance for Europe. https://www.dutchgrown.co.uk/pages/tulip-bulbs-questions-answers
-
When Do Different Bulbs Flower, Ashridge Trees. Month-by-month spring bulb flowering chart. https://blogs.ashridgetrees.co.uk/blogs/bulbs/when-do-bulbs-flower/
-
How to Plant Bulbs in Pots, Mr Fothergill's. Aftercare, watering, and frost protection for container bulbs. https://mr-fothergills.co.uk/blogs/all/how-to-plant-a-bulb-lasagne
-
Easy Tips for Layering Bulbs, Lovely Greens. Potting mix ratios and overwintering container guidance. https://lovelygreens.com/layering-bulbs-make-bulb-lasagna/
-
How to Plant a Bulb Lasagna, Blooming Backyard. Step-by-step drainage and winter shelter advice. https://www.bloomingbackyard.com/bulb-lasagna/
-
How to Plant Spring Bulbs, Blooming Expert. Depth chart, container sizing, and succession flowering data. https://www.bloomingexpert.com/garden/planting-spring-bulbs/


